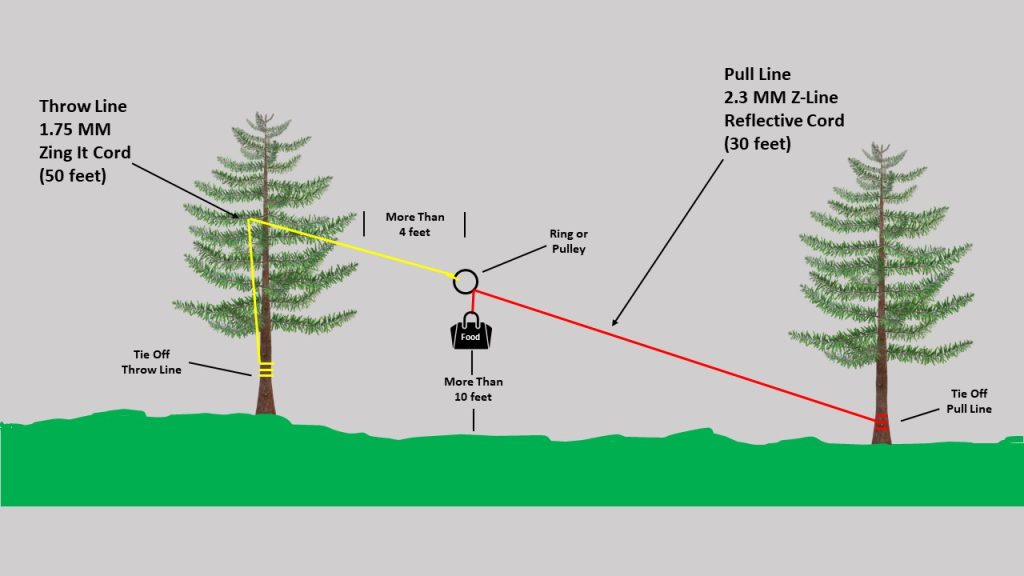
The line used to throw over the limb (“Throw Line”) is about 50 feet of 1.75 MM Zing It cord. The line that goes through the ring and used pull up the food bag (“Pull Line”) is about 30 feet of 2.3 MM Z-Line Reflective Cord from Zpacks, although any 2 MM utility cord will work. I prefer at least a 2 MM utility cord as a Pull Line since it’s easier on the hands than the Zing It cord.
On one end of the Throw Line is attached a small stainless-steel ring (a link from a small chain, a carabiner or pulley can be used instead of a small stainless-steel chain link) using a figure 8 loop which is girth hitched to the steel ring. On the other end of the Throw Line is attached a stainless steel #0 Nite Ize S-Biner using a Lark’s Head knot.
On one end of the Pull Line is attached a stainless steel #1 Nite Ize S-Biner using a figure 8 loop and then the loop is girth-hitched to the #1 S-Biner. On the other end of the Pull Line is tied a figure 8 loop.
Below is a step-by-step instruction for the 2CR bear bag system:
1. Unwind both cords and lay untangled on the ground.
2. Run the Pull Line through the small stainless-steel ring, which is attached to one end of the Throw Line. Depending on the size of the ring, the figure 8 loop may need to be untied and then retied after running the Pull Line through the ring.
3. Temporarily wrap both ends of the Pull Line around a tree, log or something heavy, and then clip the figure 8 loop to the #1 S-Biner.
4. Put a baseball sized rock or several small rocks into the rock bag. Clip the rock bag to the #0 S-Biner attached to one end of the Throw Line and throw the rock bag over a limb or fork of a tree.
5. Remove the rock bag from the Throw Line and pull the #1 S-Biner end of the Throw Line to adjust the height of the ring as necessary and then tie off the end of the Throw Line to a tree by wrapping the Throw Line around the tree and clipping the #0 S-Biner to the Throw line rather than using a knot.
6. Detach the Pull Line from the tree by un-clipping the figure eight loop from the #1 S-Biner. Attach the food bag to the Pull Line by clipping the #1 S-Biner to the food bag. Pull up the food bag to the ring and tie off the other end of the Pull Line to a tree. Make sure the food bag is at least 10 feet high, I prefer 12 feet, and make sure there are no limbs or trees within 6 feet of the food bag, a 10-foot clear area is even better.
7. Whenever you lower and remove the food bag always attach the #1 S-Biner on the Pull Line to the figure 8 loop on the other end on Pull Line, again creating a large loop out of the Pull Line, so that the Pull Line cannot be pulled through the ring accidently.
8. Before removing the Throw Line from the limb, detach the #0 S-Biner from the end of the Throw Line by undoing the Lark’s Head knot.
Sometimes adjusting the height of the ring is a trial and error process, so you may have to untie the Throw Line and adjust the height of the ring and re-tie off the end of the Throw Line. Also, I prefer to use a #1 S-Biner on the Pull Line to save weight. If the food bag or food bags cannot be clipped directly to the #1 S-Biner, run the Pull Line through the loop or cord on the food bag(s) and then clip the #1 S-Biner to the Pull Line above the food bag(s).
In some designated wilderness areas, national parks and state parks bear canisters are required. Therefore, hanging your food bag from tree or limb would not comply with the regulations in such areas.